Main Window
The main window consists of different sections: Configuration, Player, Import, Soundbank and Export.
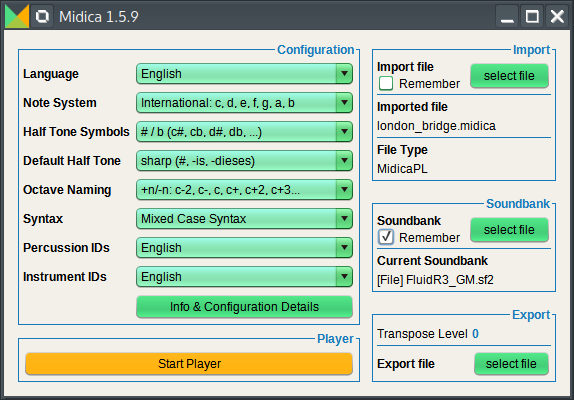
Configuration Section
In the configuration section you can configure the follwing things:

Language: GUI language
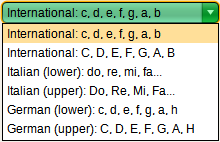
Note System: Which set of note names to use
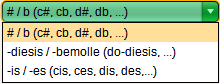
Half Tone Symbols: Which symbols to use for half tones
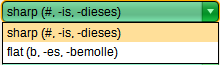
Default Half Tone: If an ambiguous half tone should be displayed as sharp or flat in the GUI
Octave Naming: How to name notes in different octaves
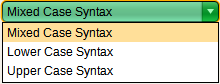
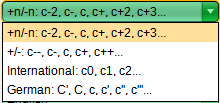
Syntax: Which keywords and case (lower/upper) to use for the MidicaPL syntax
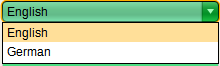
Percussion IDs: Which language to use for percussion instruments
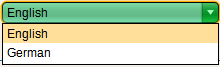
Instrument IDs: Which language to use for chromatic instruments
Import Section
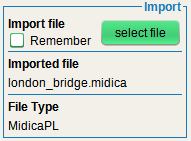
The fields Imported File and File Type describe the currently imported file.
If the Remember checkbox is checked, the same file will be imported automatically when Midica is started next time.
The select file button opens the import file chooser.
The import file chooser window contains several tabs, depending on the format of the file to be imported.
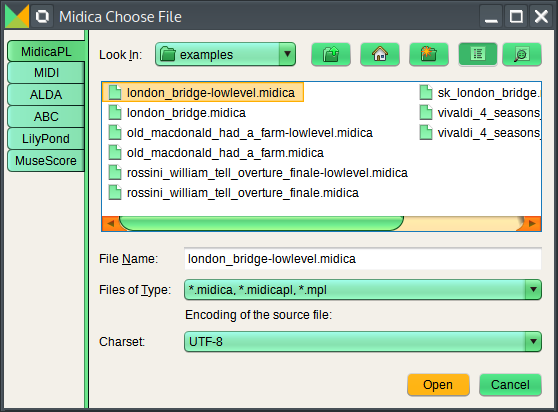
MidicaPL Tab: Choose the source code file to be imported
The encoding (charset) can also be chosen. The chosen encoding must be compatible to the source file to be imported.
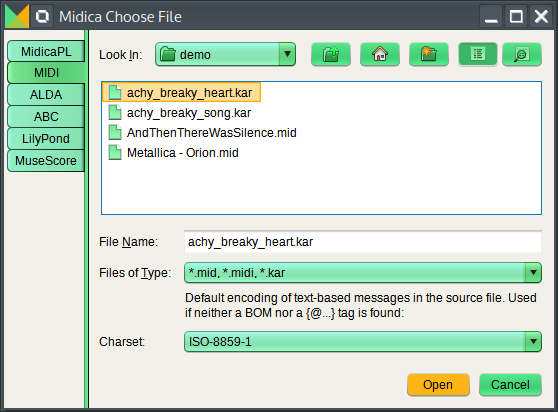
MIDI Tab: Choose the MIDI file to be imported
The default encoding (charset) can also be chosen. This is only used if the encoding cannot be found in the file itself. It is only relevant for text messages like lyrics etc.
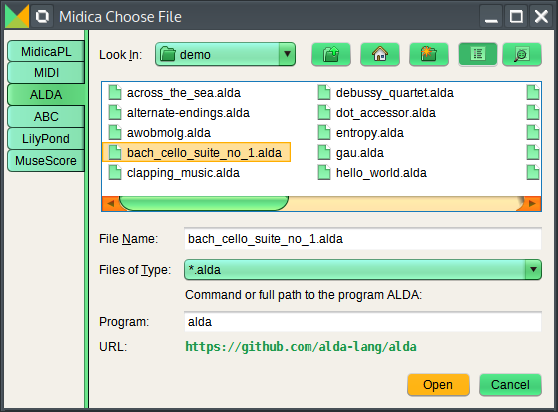
ALDA Tab: Choose the ALDA file to be imported
ALDA must be installed. The command or full path to the ALDA executable must be correctly set for importing ALDA files.
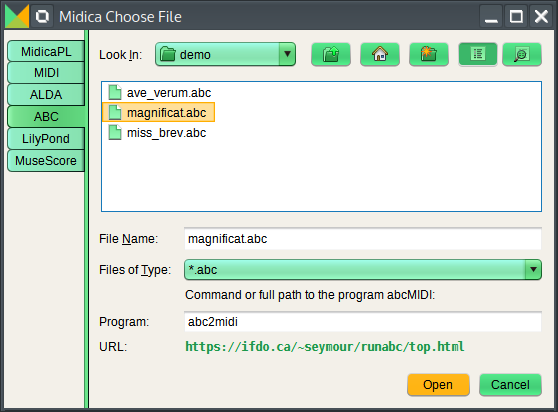
ABC Tab: Choose the ABC file to be imported
abcMIDI must be installed. The command or full path to the abc2midi executable must be correctly set for importing ABC files.
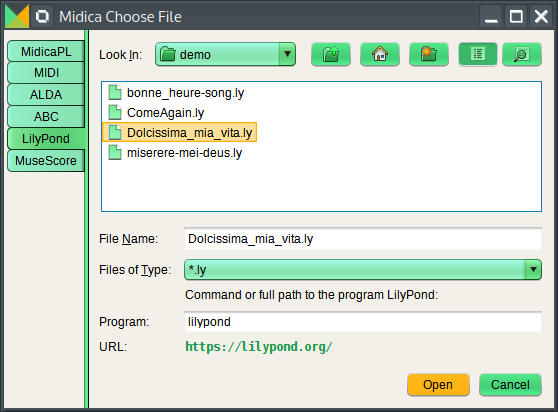
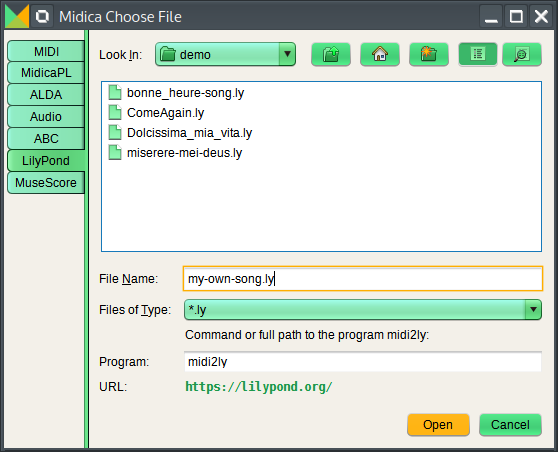
LilyPond Tab: Choose the LilyPond file to be imported
LilyPond must be installed. The command or full path to the lilypond executable must be correctly set for importing LilyPond files.
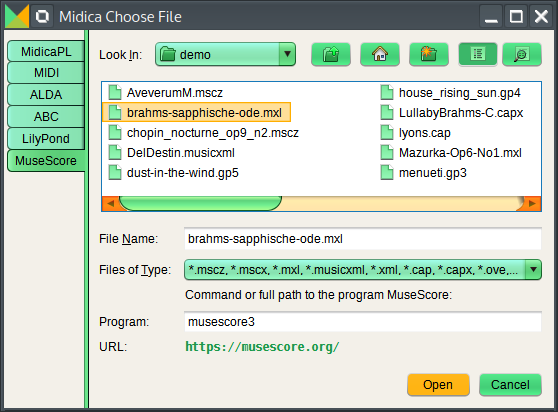
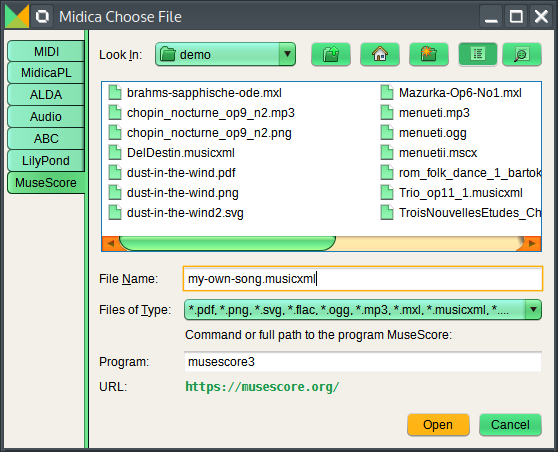
MuseScore Tab: Choose a MuseScore compatible file to be imported
MuseScore must be installed. The command or full path to the musescore executable must be correctly set for importing MuseScore compatible files.
The following formats can be imported here:
- MusicXML (compressed and uncompressed)
- MuseScore
- Guitar Pro
- Capella
- Bagpipe Music Writer
- Sonicscores Overture
- Sonicscores Score Writer
- PowerTab
Soundbank Section
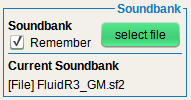
The Current Soundbank field describes the currently loaded soundbank.
If the Remember checkbox is checked, the same soundbank will be loaded automatically when Midica is started next time.
The select file button opens the soundbank file or URL chooser.
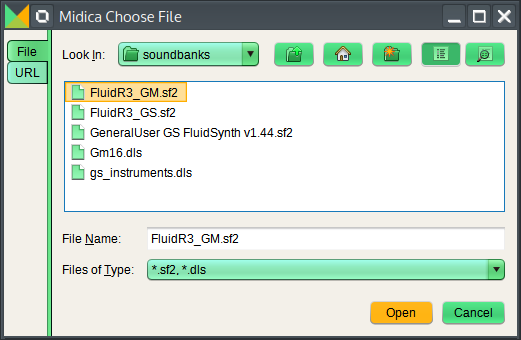
File Tab: Choose a soundbank file in SF2 or DLS format.
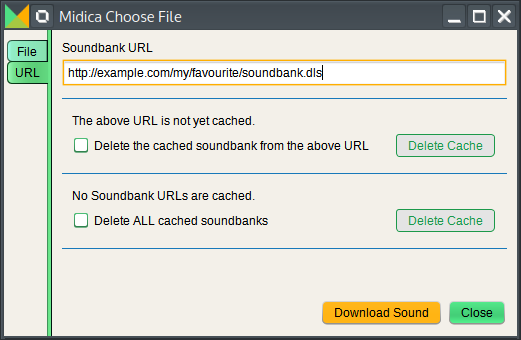
URL Tab: Choose a URL to a soundbank in SF2 or DLS format.
Already downloaded soundbanks are automatically cached. This saves time if the same URL is used a second time.
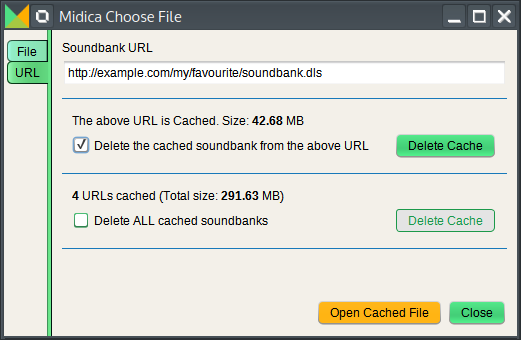
The soundbank cache can be cleared. That may be useful if an updated soundbank version is available on an already cached URL.
Export Section
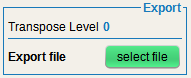
The Transpose Level shows if the music will be exported to a higher or lower pitch than the imported sequence.
The default is 0 (equal pitch). Positive values transpose to a higher pitch, negative values to a lower pitch.
The transpose level can be changed in the player.
The select file button opens the export file chooser.
The export file chooser window contains several tabs, depending on the format of the file to be exported.

MIDI Tab: Choose the MIDI file to be exported.
The encoding can also be chosen. This is only relevant for text messages like lyrics etc.
It doesn't need to be the same encoding as in the imported sequence.
However if you want to stick to the official MIDI standard, it should be either ISO-8859-1 or Shift_JIS.
If you don't care about the standard, choose whatever encoding you like.

MidicaPL Tab: Choose the MidicaPL file to be exported.
The chosen encoding is used for the complete file.
It doesn't need to be the same encoding as in the imported sequence.
This feature is still experimental!
If the Directly Import... checkbox is checked, the exported file will be directly re-imported after the export.
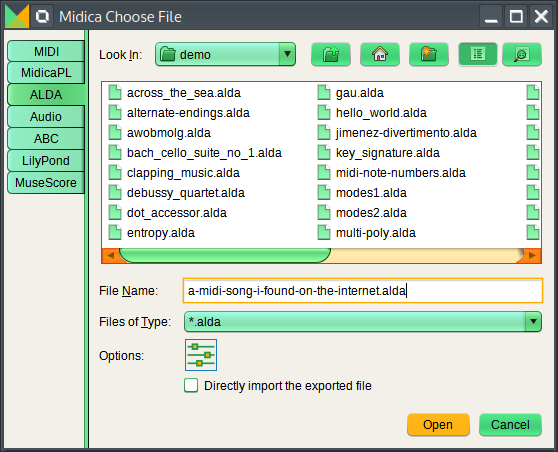
ALDA Tab: Choose the ALDA file to be exported.
This feature is still experimental!
If the Directly Import... checkbox is checked, the exported file will be directly re-imported after the export.
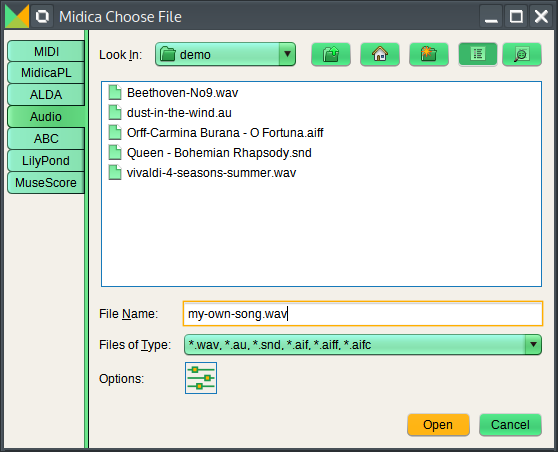
Audio Tab: Choose the Audio file to be exported.
Supported formats for the Audio export are: WAV, AU, SND, AIFF and AIFC
By clicking the Options icon you can open a window to fine-tune the audio export.
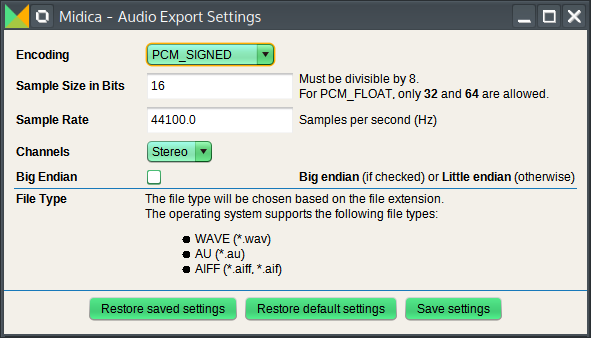
The Audio Export Settings window to fine-tune the audio export.
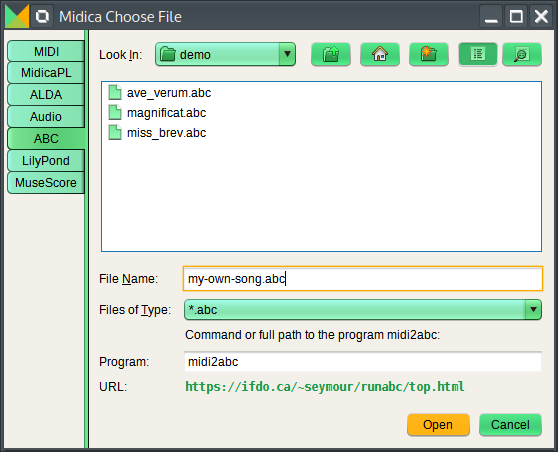
ABC Tab: Choose the ABC file to be exported.
abcMIDI must be installed. The command or full path to the midi2abc executable must be correctly set for exporting ABC files.
LilyPond Tab: Choose the LilyPond file to be exported.
LilyPond must be installed. The command or full path to the midi2ly executable must be correctly set for exporting LilyPond files.
MuseScore Tab: Choose a MuseScore compatible file to be exported.
MuseScore must be installed. The command or full path to the musescore executable must be correctly set for exporting MuseScore compatible files.
The following formats can be exported here:
- MusicXML (compressed and uncompressed)
- MuseScore
- MP3
- Ogg Vorbis
- FLAC
- PNG
- SVG
Player Section

The player section only contains the button to open the player window.
A file must have been imported before the player can be started.
Player
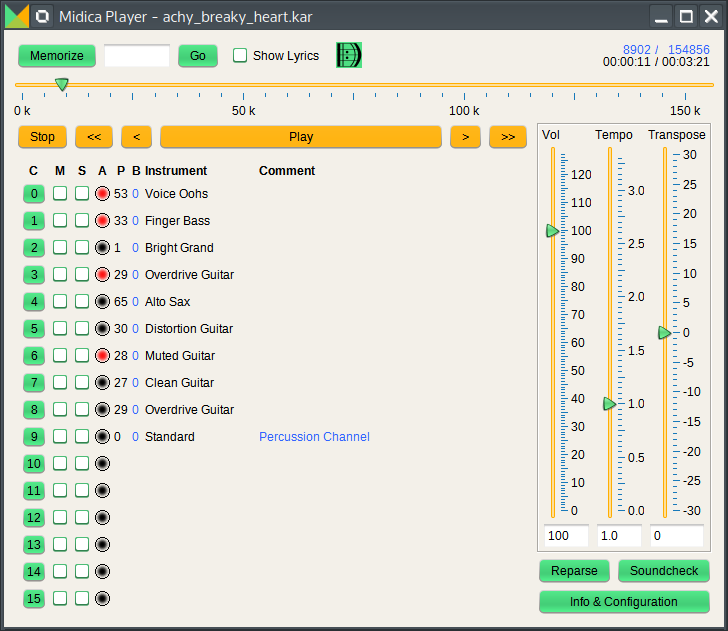
The parts of the player need a bit more explanation.
Player Widgets

Memorize remembers the current MIDI tick and writes it into the text field.
Go jumps to the MIDI tick in the text field.
The text field can also be edited manually before jumping to a new position.
Ticks & Times
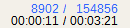
Top left: Current MIDI tick in the sequence
Bottom left: Current time in the sequence
Top right: Total ticks of the sequence
Bottom right: Total time of the sequence

Progress Bar: Shows the current position of the sequence in MIDI ticks. Depending on the total number of ticks the unit will be adjusted automatically. In the example image it's k for kilo. So 150 k means Tick 150000

Control Elements
Play begins or resumes playing from the current position. Only visible when not playing.
Pause stops playing but keeps the current position. Only visible when playing.
Stop stops playing and resets the current position to 0.
<< respectively < decrements the current position by 16 respectively 4 quarter notes.
> respectively >> increments the current position by 4 respectively 16 quarter notes.
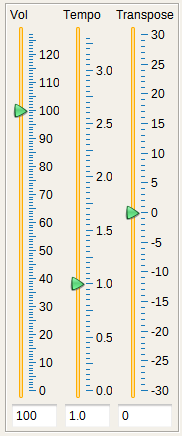
Sliders
Vol changes the master volume. This affects all channels.
Tempo changes the tempo of the sequence. Normal tempo is 1.0, more is faster, less is slower.
Transpose increments or decrements the key of the sequence. Positive values transpose to a higher pitch, negative values to a lower pitch.

Reparse
Parses the imported file again and rebuilds the sequence. This is useful after editing the imported source file.
 or
or 
Parse success Icon
Shows, if the sequence could be parsed or not. A happy, green icon indicates success. A red, unhappy icon indicates a parsing error.
The icon may change after hitting the reparse button.
Channel Mode
The channel mode is the default mode. It's visible as long as the Show Lyrics checkbox is not checked.
Overview
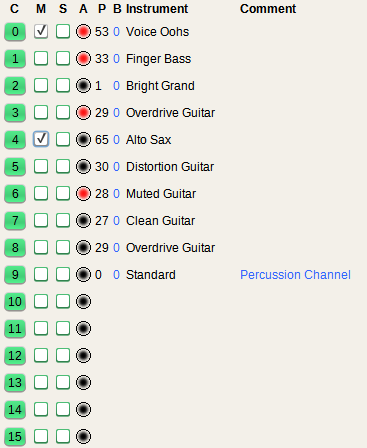
This section is an overview over the activity of all channels. It consists of the following columns:
C
Channel Number – Midica uses numbers from 0 to 15 whereas most other applications use numbers from 1 to 16. So here the percussion channel is 9 instead of 10.
M
Mute – A muted channel does not produce any sound.
S
Solo – If at least one channel is configured as Solo than only those channels produce sound which are also configured as Solo.
A
Activity – determines if one or more keys are currently playing in this channel; black: inactive (no key is currently played); red: active (at least one key is currently played)
P
Program Number – The instrument's program number as defined by the General MIDI standard
B
Bank Number – The bank number as defined by the General Standard extension of MIDI and also by General MIDI Level 2
Instrument
Instrument name like it's named in the currently loaded soundbank
Comment
Channel comment – The text given by the MIDI meta message Instrument Name, if available.
Details
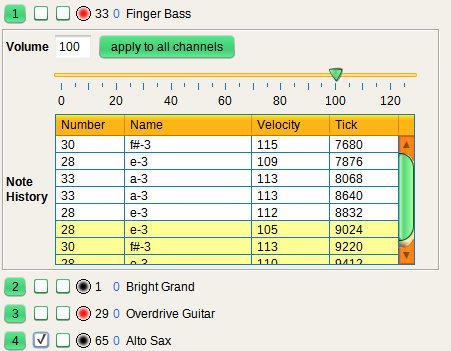
The details of a channel are shown by clicking the channel number. The following data can be viewed or changed:
Volume
The currently configured channel volume. Minumum is 0, maximum is 127, and default is 100.
Note History
with a white background: the last played notes from the past;
with a yellow background: the next notes in the future.
Table Columns:
Number
Note number as defined by General MIDI
Name
Note (or percussion instrument) name as configured in the main window
Velocity
Velocity of the note
Tick
MIDI tick
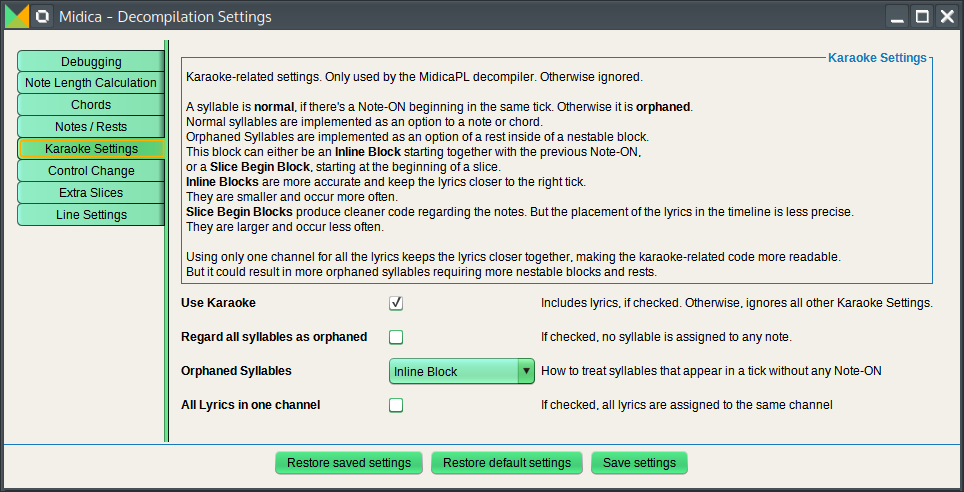
Karaoke Mode
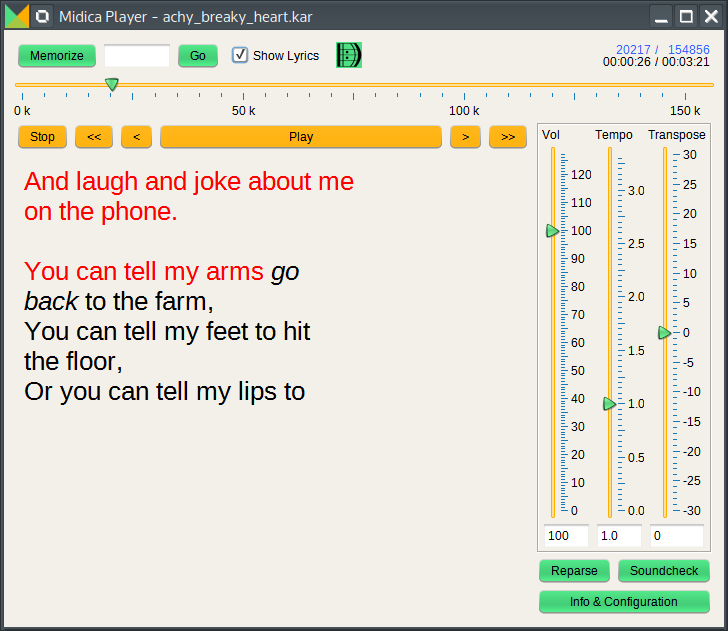
By checking Show Lyrics the lyrics are shown instead of the channel details.
- Future syllables are shown in black
- A quarter note before appearing, a syllable is turned to italic and black
- As soon as a syllable appears, it is turned into red
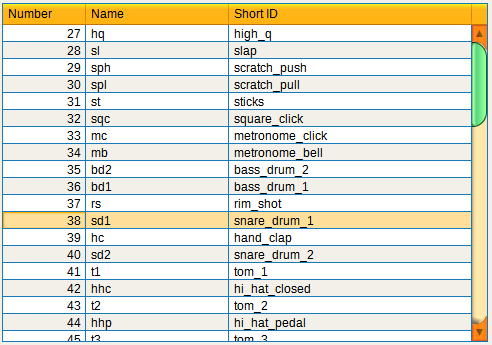
Soundcheck
A click on the Soundcheck button in the player window opens the soundcheck window. This can be used to check the sound of the instruments in the currently loaded soundbank.
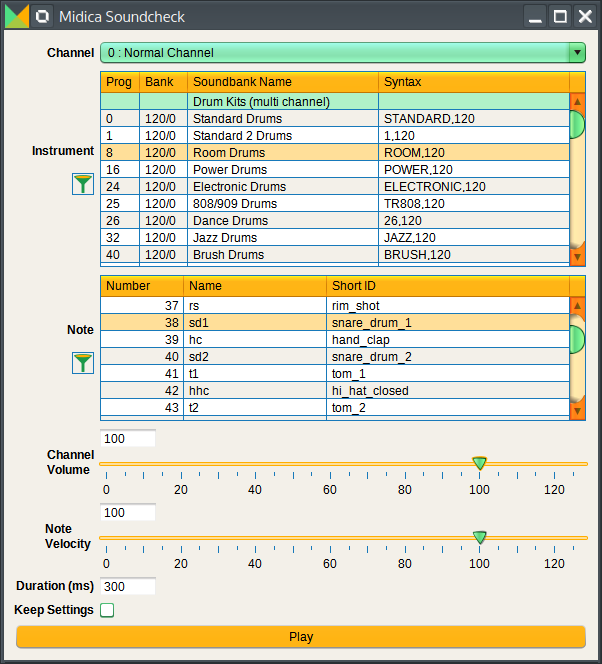
Each channel can have different instruments or drum kits. This information is read from the soundbank. Depending on the chosen channel, only the supported drum kits or instruments are displayed.
The percussion channel contains only drum kits.
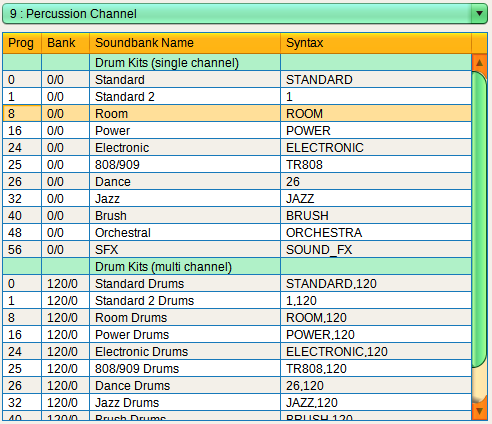
Other channels usually only contain chromatic instruments. But in some soundbanks they can also contain multi channel drum kits.
The chromatic instruments are grouped in categories like defined in the General MIDI standard.
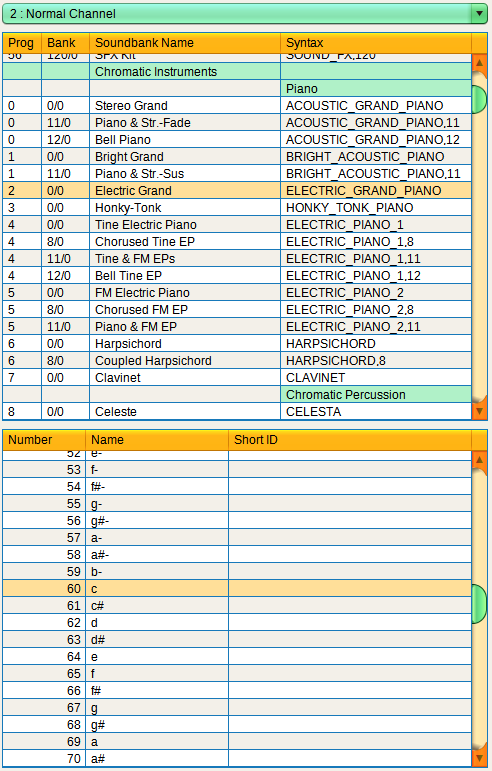
If a chromatic instrument is chosen, the Note list contains normal notes.
If a drum kit is chosen, it contains percussion instruments.
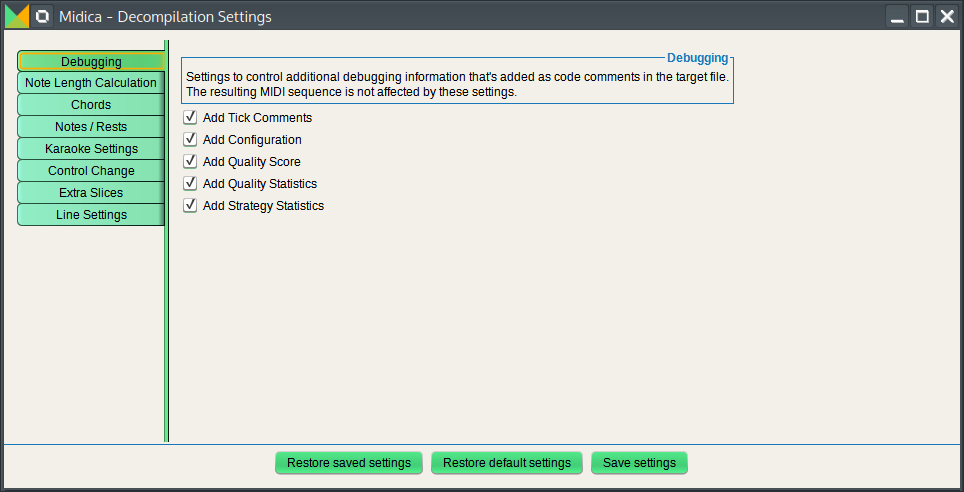
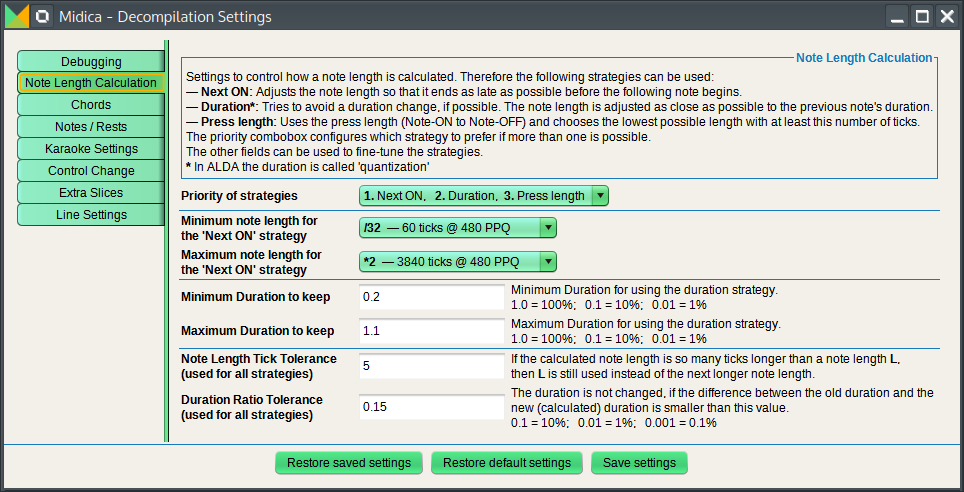
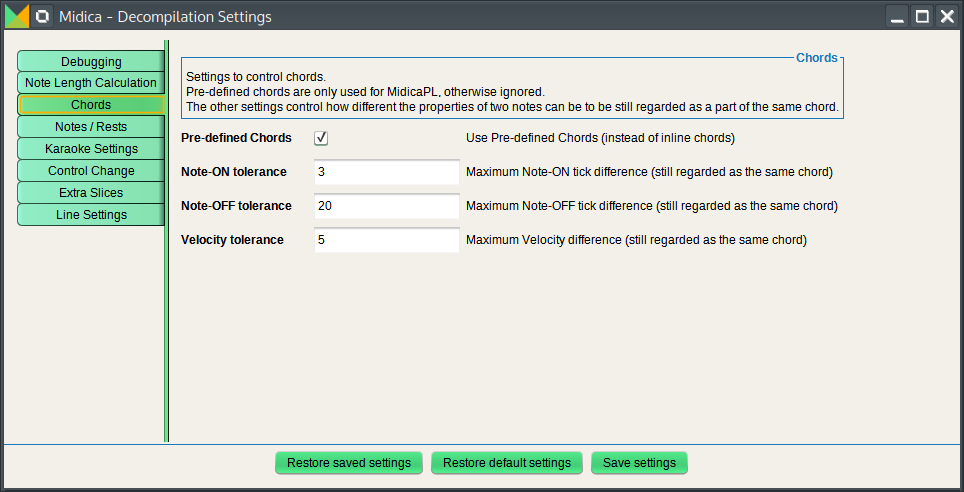
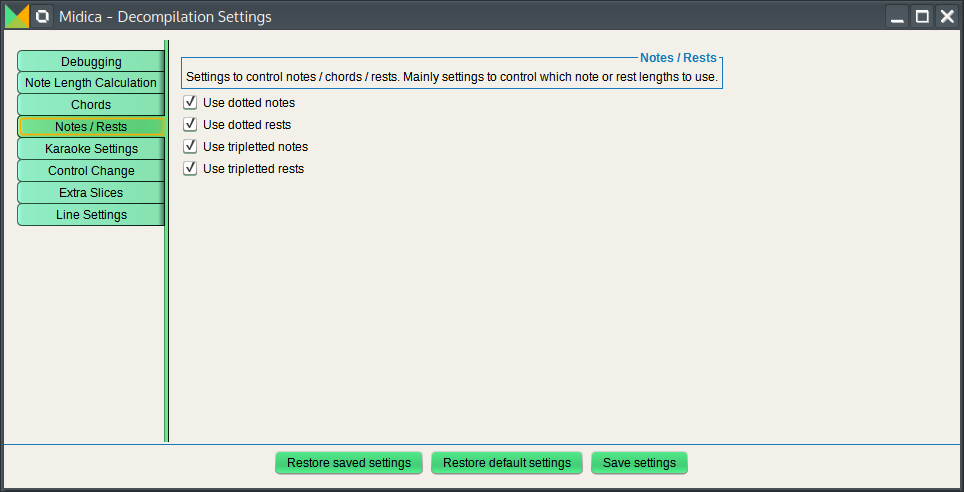
Decompiler
In the export window, in the tabs for MidicaPL or ALDA, there is a decompile config button. It can look different, depending on its state:

The default look of the decompile config button.

The decompile config button when hovered with the mouse.

The decompile config button when one of the configuration changes is invalid.

The decompile config button when one of the configuration changes is invalid, hovered with the mouse.
Decompile Config
A click on the decompile config button opens the decompile configuration window. Here you can fine-tune the decompilation process and adjust the settings to the MIDI sequence you want to decompile.
Decompile Result
If the decompilation has been completed, a result window opens and shows all warnings that have occurred during the process. The warnings can be filtered.
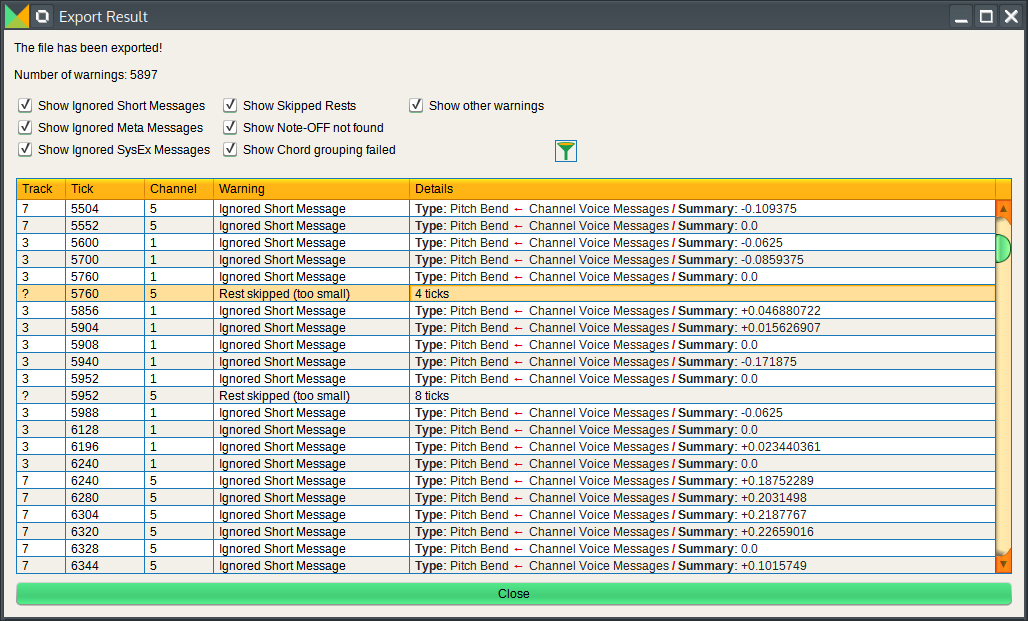
Table Filter
For most tables there is a table filter icon. It can look different, depending on its state:

The default look of the table filter button.

The table filter button when hovered with the mouse.

The table filter button when the filter contains a string.

The table filter button when the filter contains a string and the button is hovered with the mouse.
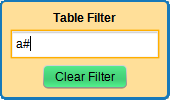
After clicking the button, the table filter opens.
When a string is typed into the table filter, the filter is active. That means that the according table only shows rows that contain this string in any of their columns.
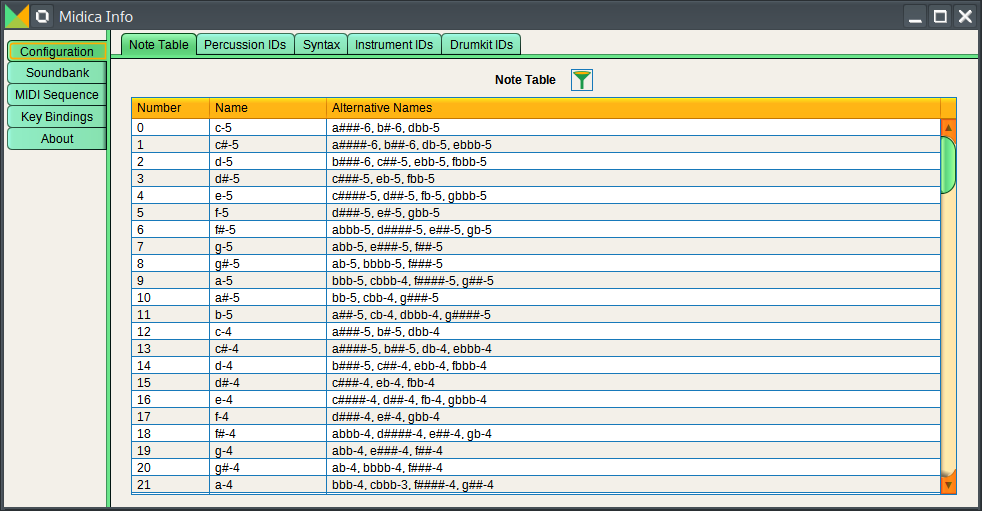
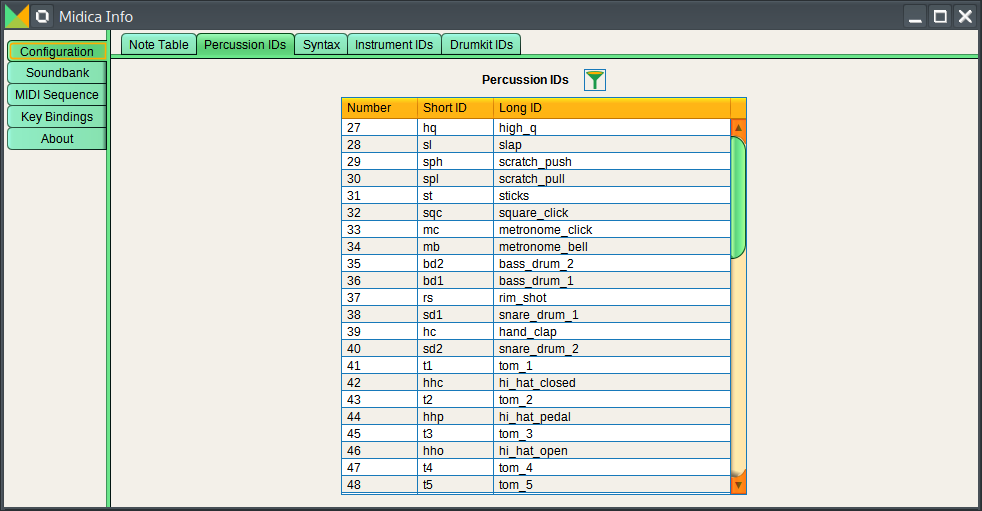
Info Window
The Info window can be reached by clicking Info & Configuration Details, either from the main window or from the player.
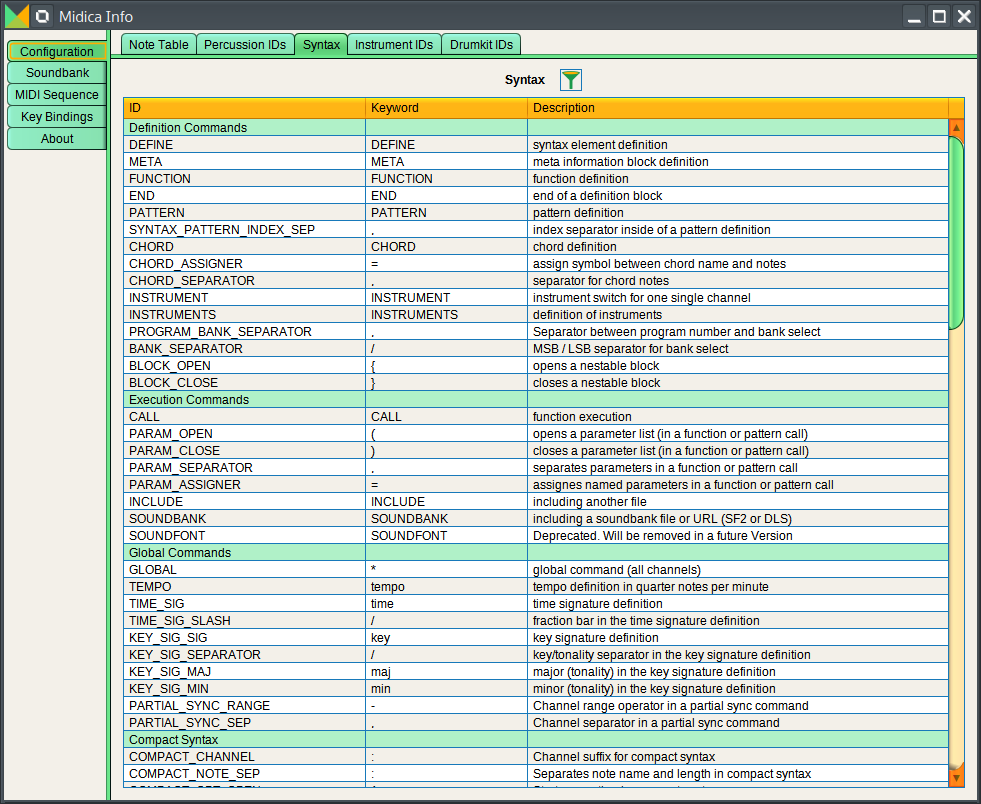
Configuration Tab
In the Configuration tab you can view the current configuration, mainly used for the interpretation of MidicaPL source files.
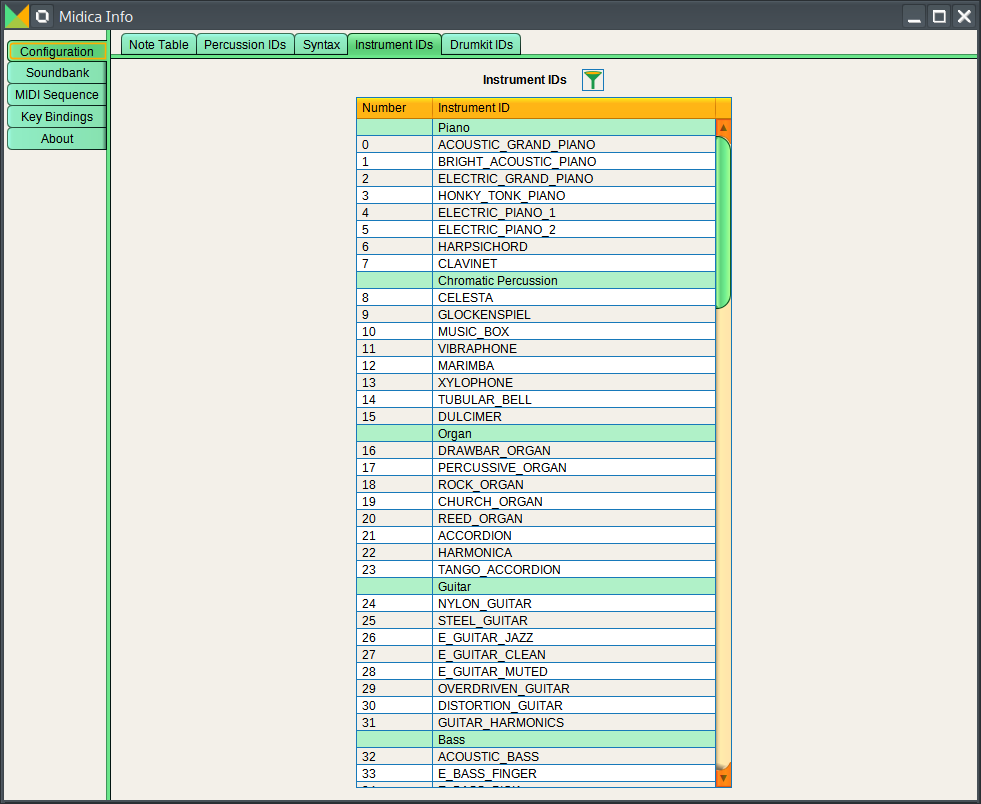
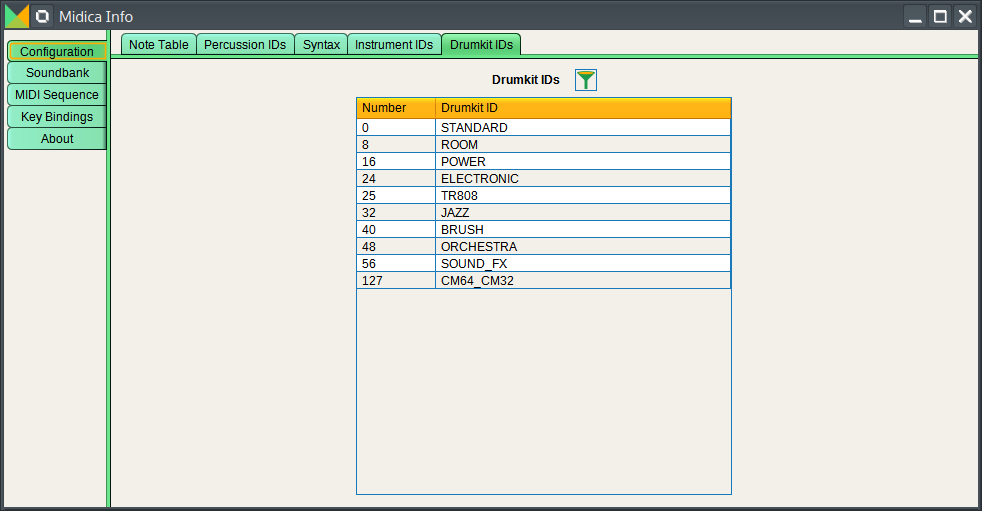
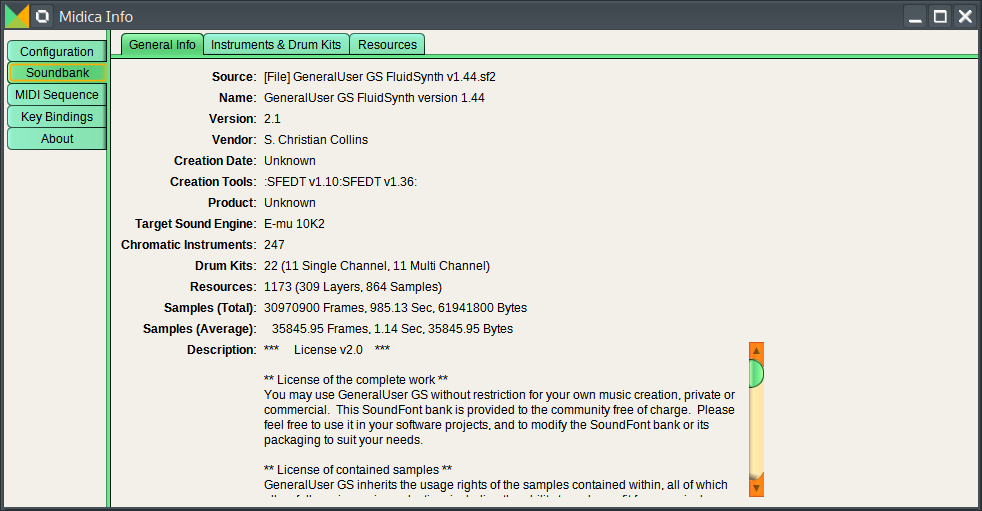
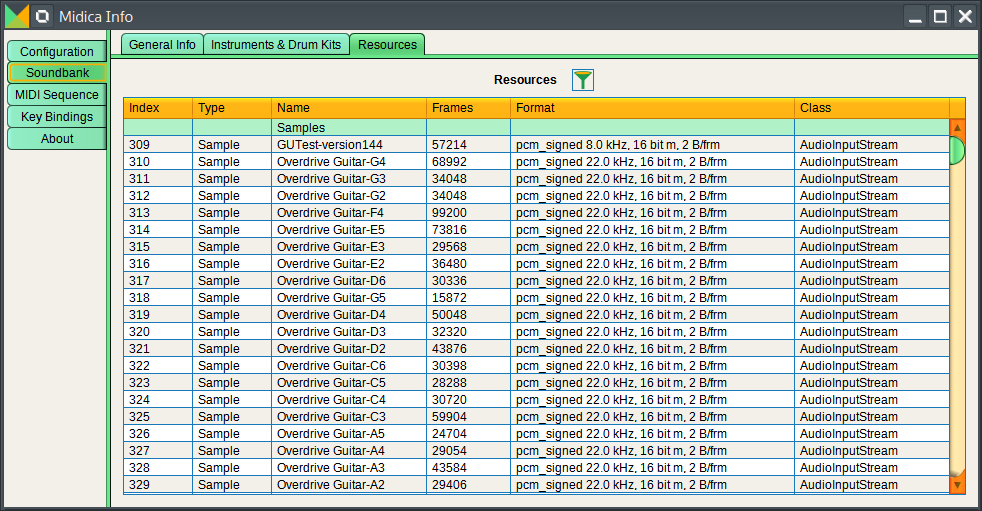
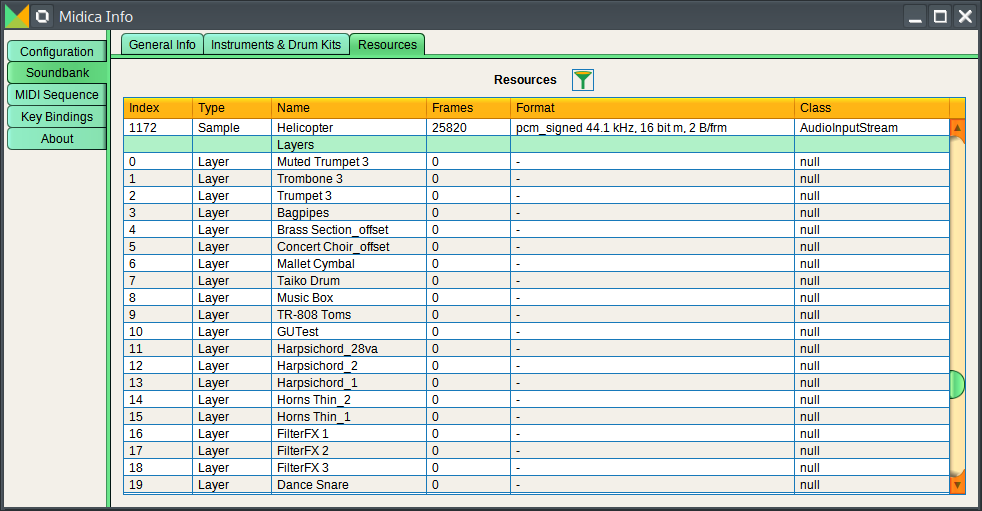
Soundbank Tab
The Soundbank tab can be used to analyze the currently loaded soundbank.

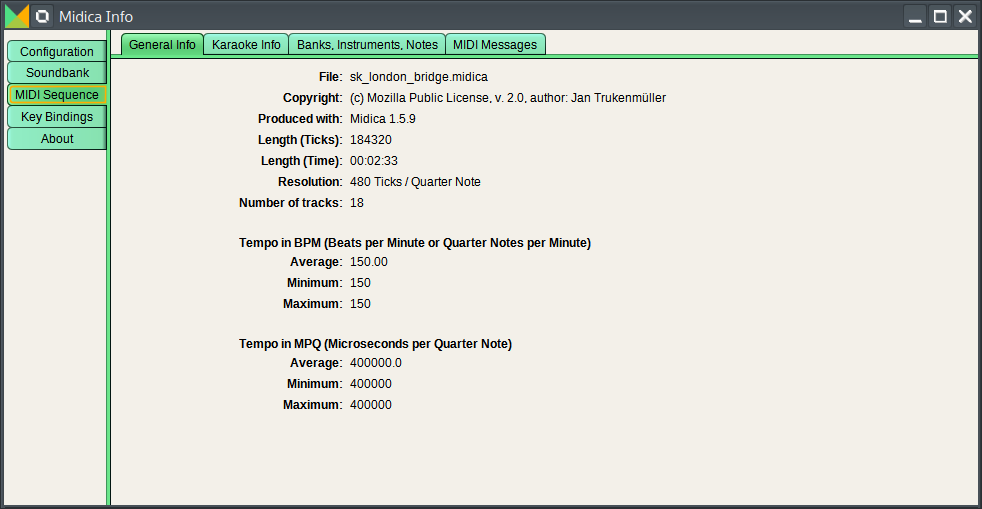
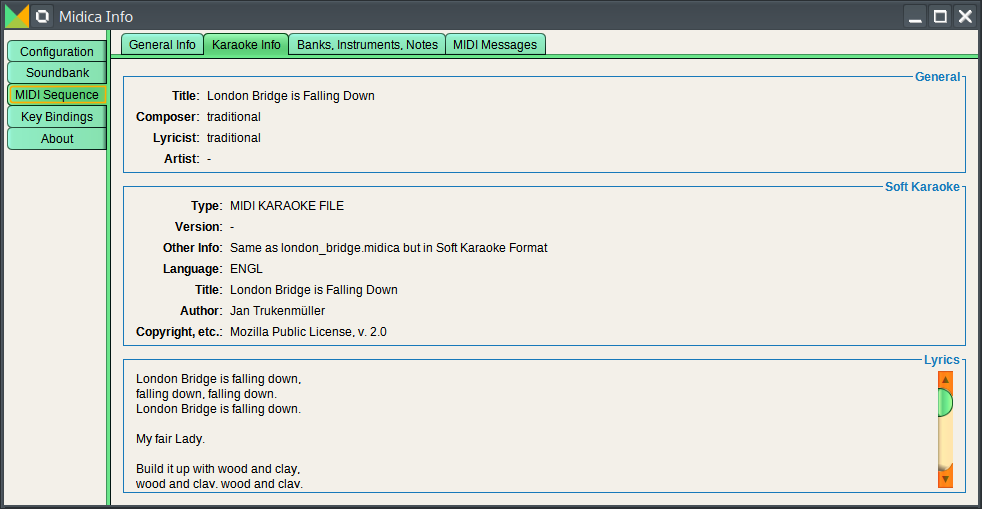
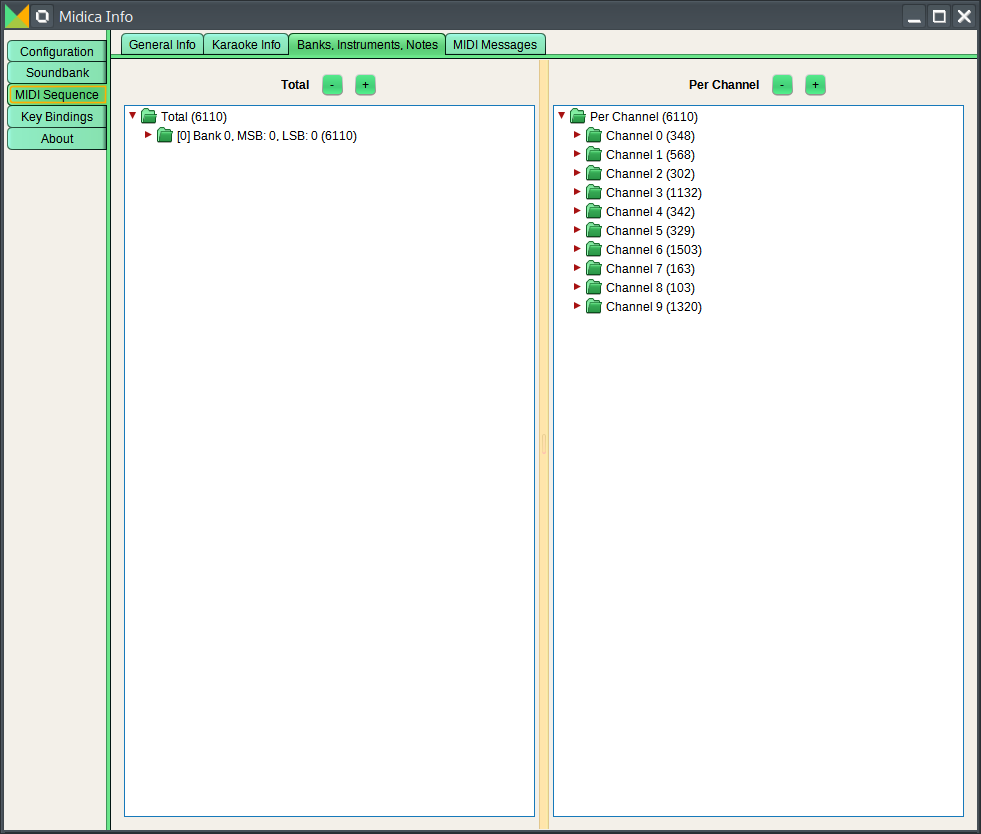
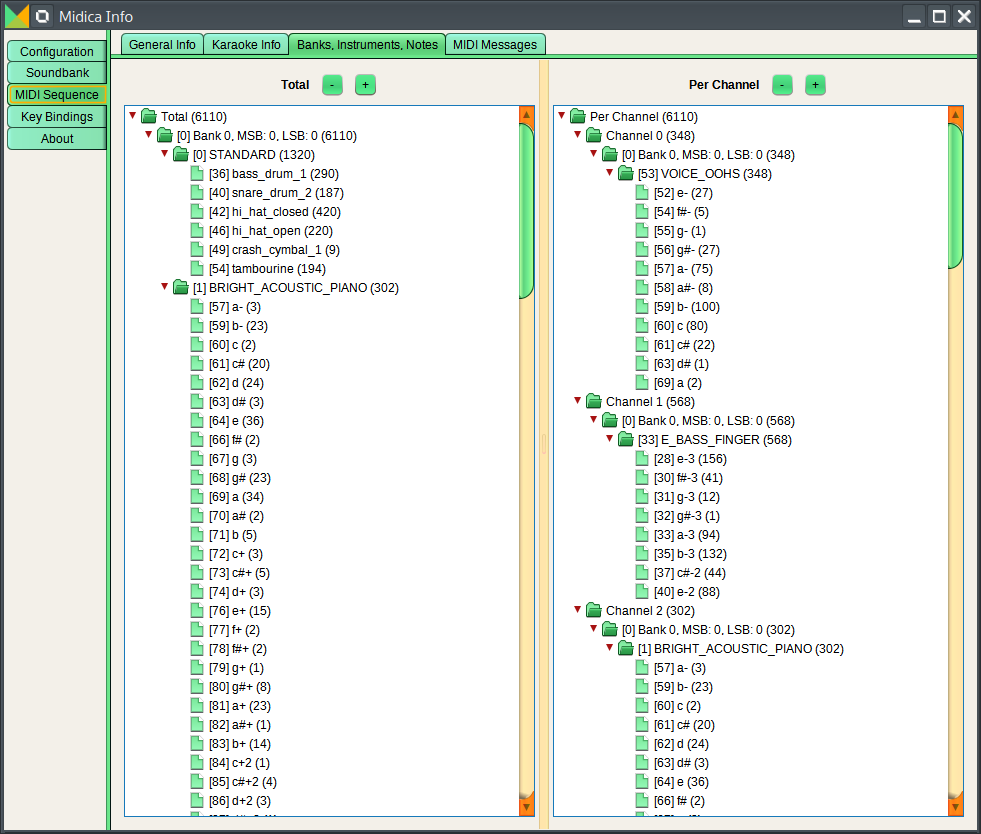
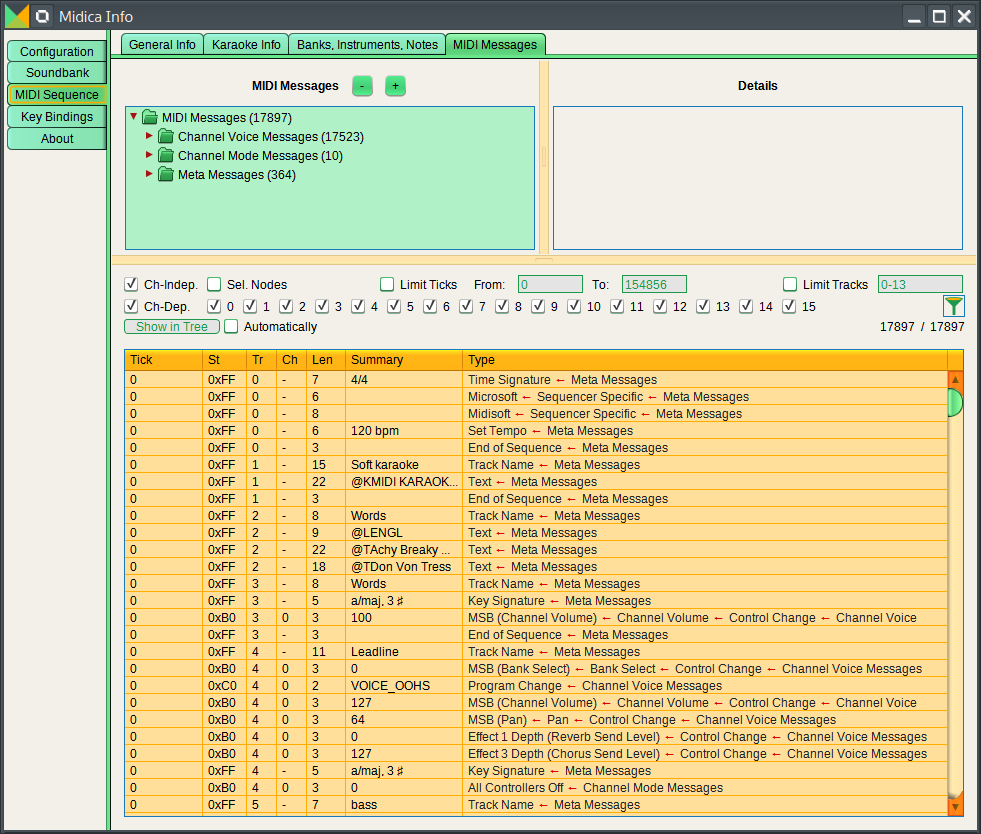
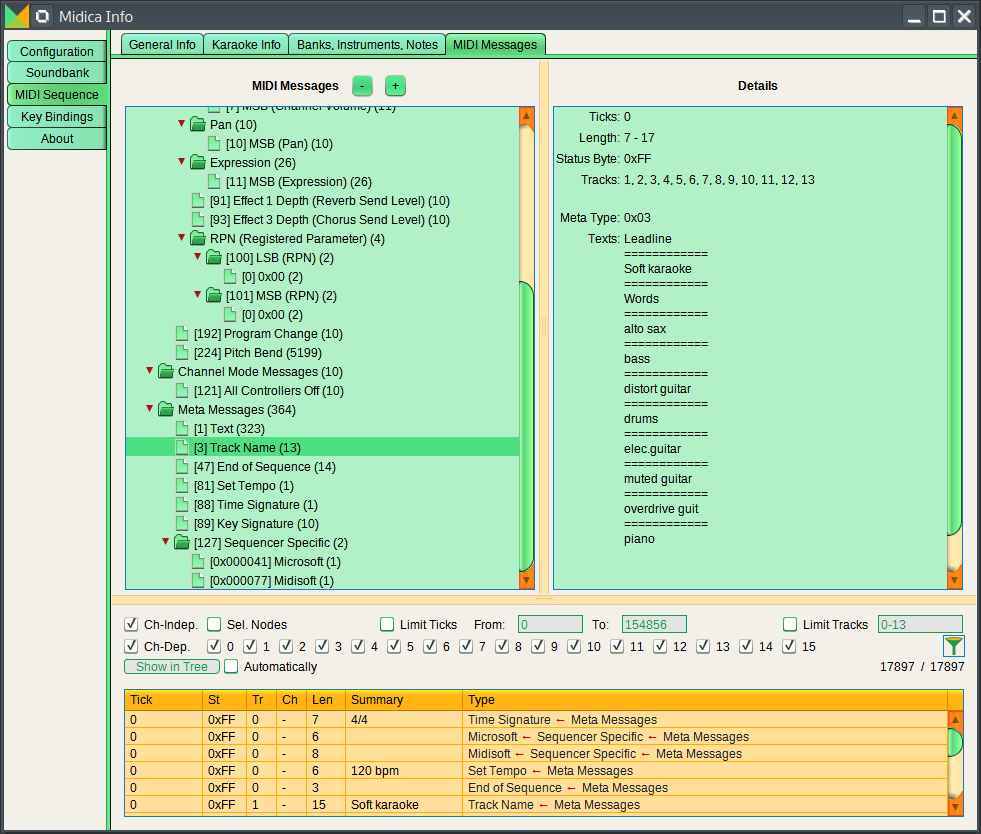
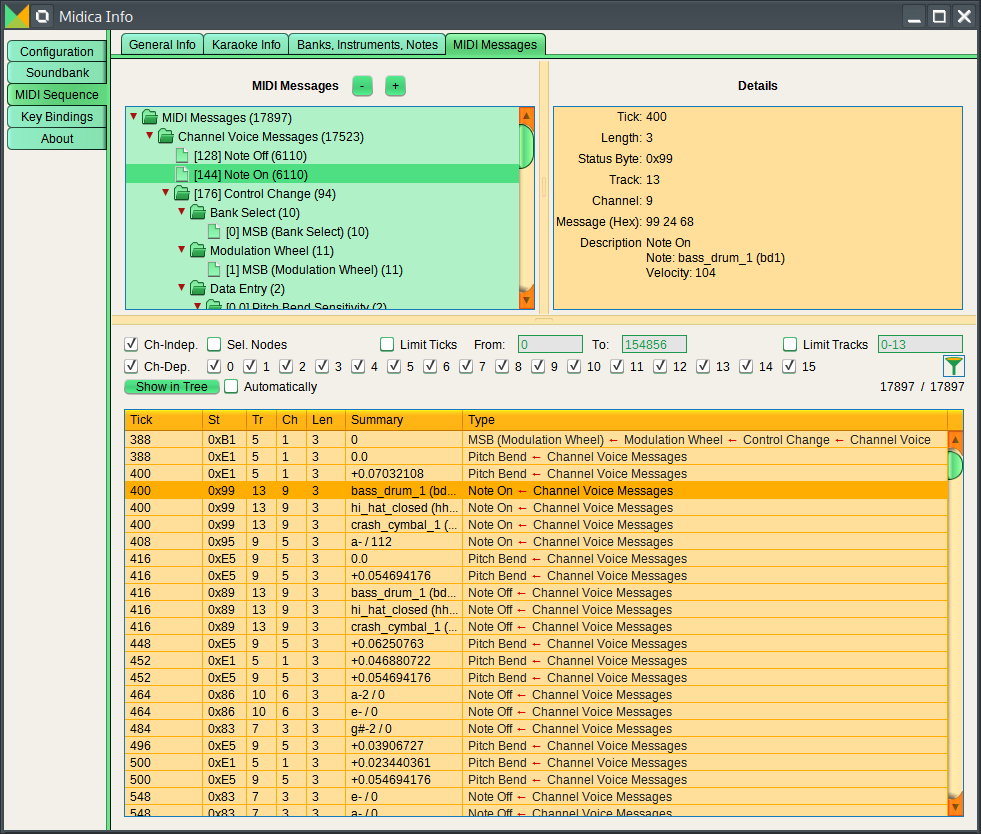
Sequence Tab
The Sequence tab can be used to analyze the currently loaded MIDI sequence, no matter if it has been loaded from a MIDI file, a MidicaPL file or any other format.
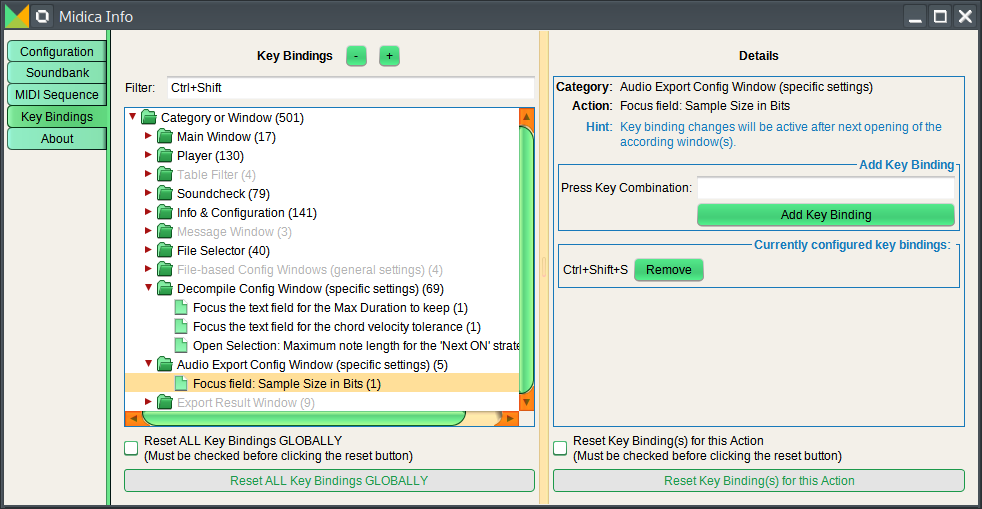
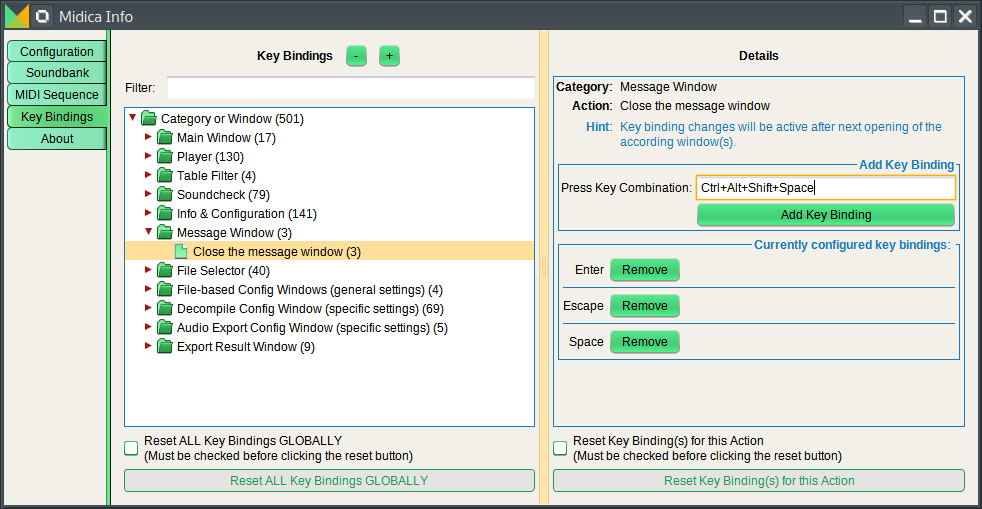
Key Bindings Tab
The Key Bindings tab can be used to show or configure key bindings. The tree on the left side contains all actions for which key bindings can be configured, grouped by the window where they appear.
In the filter field you can filter by action description or key binding. Windows without any action matching the filter are displayed in gray.
When an action is selected in the tree, its details are displayed on the right side. An action can contain more than one key bindings. You can add your own key bindings by pressing the key combination while the according field is focused.
About Tab
The About tab shows information about the version, date, etc.
